Tuesday, May 14, 2013

Orb-ing lighting


Since I'm new to this whole, "do-it-yourself" thing I should know everything isn't going to work out perfectly. We ran into some difficulties when trying to install a new light fixture in the guest bathroom. The light in the bathroom was brushed nickel and all the other fixtures (besides the faucet) is oil-rubbed bronze (orb). Plenty-a-time was spent online shopping for a new fixture since there were some specific issues we had to navigate. I did not want to re-paint the bathroom right now so to make it easy we went with a light fixture with a long back plate.


Inexpensive, large enough to cover where the old light fixture was and the right color...right? right???
Well here is where we ran into a problem. You see where the wires are suppose to go on the back plate?


Well whoever added the bathroom onto our house did some funky wiring. They cut a hole on the right side of the plate and ran wires from the fixture over to the wall wires. We didn't have the tools to cut through metal and we couldn't re-use the existing back plate because it was too small for the new fixture. What were we to do? Such a first world problem huh? Well fortunately there is a magic spray to make everything all better.


Rustoleum All-Surface paint in oil rubbed bronze. I spray painted the existing brushed nickel fixture. We exchanged the light fixture we bought and got new one for the upstairs guest bath (will post soon on that bathroom re-do). I've never actually spray painted anything until the other day. Here's how I did it after the hubs took down the fixture:


**Turn off the breaker prior to working with electrical wires**

You can see why we had to use a fixture with a long back plate- to cover the paint or lack thereof.


Step One: Tape the ground wire (the copper looking wire) up with some electrical tape to protect it.


Step Two: Clean off fixture with a damp washcloth.

Step Three: Using 400 grit sandpaper, sand down all metal surfaces. Do not use any other grit of sandpaper! It will be too rough on the metal surface. The sandpaper helps to rough up the surface so the paint can stick to it.


Step Four: Wipe off with dry washcloth.

Step Five:  Lay out fixture on a drop cloth (old tablecloth, plastic sheet, broken down cardboard box) in a well ventilated area. I laid everything out in my garage and opened the garage door.


Step Six: Shake can of paint well and follow directions on the can. It basically says to hold the can 8-12 inches away from whatever you are spray painting, spray continuously one light coat. Wait a few minutes and spray a second light coat. Orb-ing orb-ing orb-ing...


Wait at least 24 hours to let dry and then re-install. I had the hubs help me with this part due to some electrical wiring I was not comfortable doing. However, I'm sure I can do it by myself now. 


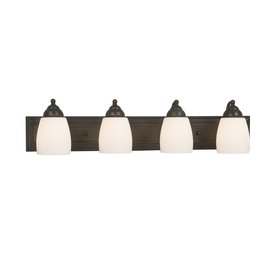
Here is the finished product. I forgot to take a "before" picture as I'm still new to this blogging thing. But just imagine this same fixture in brushed nickel. I'm pretty happy with how this turned out. Total cost of this project= less than $10.00! That sure beats buying a new light fixture!


Wednesday, May 1, 2013

Bathroom Vanity Upgrade (First post)

One of the guest bathrooms needed some help. The honey oak builders grade vanity is fine for some, but not our style. I contemplated painting it and scoured blogs and "how-to" websites, but ultimately decided to go with gel stain. What I discovered with gel stain is it doesn't "drip" like regular stain, therefore making it better for vertical surfaces. Besides painting walls I've never done any DIY projects, but staining looked easy enough and would be a lot less expensive than buying a new vanity. Our vanity has two drawers, two cabinets and is approximately 48"x30".


Supplies are as follows:


  • Screwdriver
  • Damp washcloth and soap
  • Dry washcloth
  • Frog tape
  • Latex or Latex-free gloves
  • Wood filler
  • Plastic joint knife
  • 2 in Foam brushes (you can use a tube sock as well but I didn't have any old ones to use)
  • Sanding sponge (220 grit)
  • Tack cloth
  • Painting pyramids
  • Drop-cloth (an old tablecloth, broken down boxes, a large plastic bag or sheet would work as well)
  • General Finishes Gel Stain in Java (found at Woodcraft) *the 60 year old man who helped me at Woodcraft asked me if I found this project "on the Pinterest?"
  • General Finishes Gel Topcoat in Satin (found at Woodcraft)


Step One: Use a screwdriver to remove cabinet door(s) and any hardware. Place hinges and hardware in a container so you won't lose them, unless you plan to replace them with new ones.


*Our toilet paper holder was attached to the vanity. It left four small holes in the side of the vanity once it was removed, so I followed directions on the tub of wood filler and used a plastic joint knife to apply it. You may not have this problems so I did not include this as a "step" per se.


Step Two: Remove drawer(s). For the life of me I could not remove the drawers so I was just really careful when staining.

Step Three: Take your damp washcloth with some soap (I used Dawn dishsoap) to remove dirt, grime, etc all over the vanity, cabinet door(s) and drawer(s). Then use your dry washcloth to dry.

Step Four: Tape off any areas you want to protect (i.e. floor, walls, countertop).


Step Five: Sand down the vanity, cabinet door(s) and drawer(s). I've never sanded anything in my life and it took me approximately 15 minutes total.


Step Six: Wear gloves and wipe down everything after sanding with the tack cloth. It helps pick up what was sanded off.

Step Seven: Put on new gloves. Open can of gel stain, stir, and use a foam brush to apply a light coat of stain to the vanity. Brush in the direction of the wood grain.


Step Eight: Place your drop cloth on the floor and set painting pyramids on it. Prop your cabinet door(s) on the pyramids and apply a light coat of stain. Brush in the direction of the wood grain.


First coat...


Let first coat of stain dry for 12-24 hours. Honestly the first coat is pretty ugly, so don't be surprised. On Day Two repeat steps 7 and 8. 


Let the second coat of stain dry for 24 hours and on Day Three repeat steps 7 and 8 again. Wait 4-5 days and continue with...


Step Nine: Put on gloves. Open can of gel topcoat, stir, and use a foam brush to apply a light coat of the urethane. Let first coat dry for 24 hours and repeat this step.

I let the second topcoat dry for another 24 hours and removed the frog tape and re-hung the cabinet doors. I wanted to install hardware since there was no pulls or knobs. I felt those would help make the vanity look more finished. 

Due to procrastinating being busy, we waited 4 days before installing the hardware. We found these knobs at Lowe's on clearance for around $3.00/knob.


My husband helped install the hardware. I'm still learning my way around a drill.


We used these handy-dandy templates to guide where we'd drill the holes for the hardware.


Ta-da! Behold the finished product. I wanted to be able to still see the wood grain and I think it turned out well.


This is just a step-by-step for re-vamping the vanity. Total cost= less than $100.00. I plan on re-painting this bathroom, painting the floor trim white, installing a new towel bar and new lighting. Stay tuned for this bathroom make-over...